Introduction

The Java Development Kit (JDK) is software used for Java programming, along with the Java Virtual Machine (JVM) and the Java Runtime Environment (JRE). The JDK includes the compiler and class libraries, allowing developers to create Java programs executable by the JVM and JRE.

Although many open-source Java tools are available online such as NetBeans, Android Studio, Maven, and a lot of others, before we begin writing our code, we need to make sure that our computer is already installed with JDK. However, in this tutorial, we will use a text editor, and a command prompt to write, compile, and run the code.

Checking the Java Version

Before installing the Java Development Kit, you need to check if a Java version is already installed on Windows. To check it, you can follow the steps below:

1. Open a command prompt by typing cmd in the search bar and press Enter.

2. Run the following command java -version as shown below:

C:\Users\TC>java -version
‘java’ is not recognized as an internal or external command, operable program or batch file.
C:\Users\TC>

The command outputs the Java version on your system. If Java isn't installed, the output is a message stating that Java isn't recognized as an internal or external command.

Download Java for Windows 10

Download the latest Java Development Kit installation file for Windows 10 to have the latest features and bug fixes. Using your preferred web browser, navigate to the Oracle Java Downloads page (CLICK HERE). On the Downloads page, click the x64 Installer download link under the Windows category.

installing Java

Then, wait for the download to complete.

Install Java on Windows 10

After downloading the installation file, proceed with installing Java on your Windows system. Follow the steps below:

Step 1: Run the Downloaded File

1. Double-click the downloaded file to start the installation, OR

2. Right-click the downloaded file, and select “run as administrator”

Step 2: Configure the Installation Wizard

After running the installation file, the installation wizard welcome screen appears.

1. Click Next to proceed to the next step.

installing Java

2. Choose the destination folder for the Java installation files or stick to the default path. Click Next to proceed.

installing Java

3. Wait for the wizard to finish the installation process until the Successfully Installed message appears. Click Close to exit the wizard.

installing Java

Set Environmental Variables in Java

Set Java environment variables to enable program compiling from any directory. To do so, follow the steps below:

1. Open the Start menu and search for environment variables.

2. Select the Edit the system environment variables result.

installing Java

3. In the System Properties window, under the Advanced tab, click Environment Variables…

installing Java

4. Under the System variables category, select the Path variable and click Edit:

installing Java

5. Click the New button and enter the path to the Java bin directory:

installing Java

Note: The default path is usually C:\Program Files\Java\jdk-19.0.1\bin.

Test the Java Installation

Run the java -version command in the command prompt to make sure Java installed correctly.

If installed correctly, the command outputs the Java version. You can follow the step below to check it:

1. Open a command prompt by typing cmd in the search bar and press Enter.

2. Run the following command java -version as shown below:

3. If you had successfully installed the JDK, the output will be as shown below:

C:\Users\TC\Desktop\JAVA>java -version
java version "19.0.1" 2022-10-18 Java(TM) SE Runtime Environment (build 19.0.1+10-21)
Java HotSpot(TM) 64-Bit Server VM (build 19.0.1+10-21, mixed mode, sharing)
C:\Users\TC\Desktop\JAVA>

Making Sure Java Is Working

To make sure everything works, write a simple java program in a text editor. Then, compile and run it using cmd. You can follow the steps below:

Step 1: Write and Save Java program (HelloWorld.java)

1. Open a text editor such as Notepad++ and create a new file.

2. Enter the following lines of code and click Save:

public class HelloWorld{
public static void main(String args[]){
	System.out.println("Hello world!");
	}
}

3. Name the file as HelloWorld and save it as a Java source file (*.java).

Note that: For Java to recognize this as a public class (and not throw a compile time error), the filename must be the same as the class name (HelloWorld in this example) with a .java extension. There should also be a public access modifier before it.

Step 2: Compile and Run the HelloWorld.java

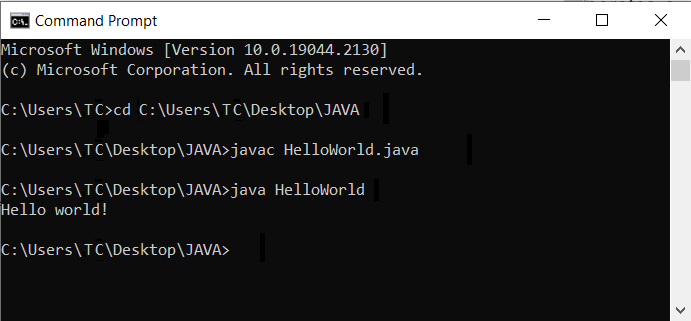
1. In the command prompt, change the directory to the file's location, for example, if your file location is at "C:\Users\TC\Desktop\JAVA", you can type in the following code in cmd to go to the directory.

cd C:\Users\TC\Desktop\JAVA

If for example your file is at different location which is in different drive (e.g. D:JAVA\), you need to change the drive from C: to D: by typing in the following code:

D:

Then, you can use cd to go to the directory by entering the following code:

2. Once you are in the right location of your java file, use the following syntax to compile the program:

javac HelloWorld.java

After a successful compilation, the program generates a .class file in the file directory. In this case, it will generate HelloWorld.class file.

3. Run the program with the following syntax:

java HelloWorld

The output shows that the program runs correctly, displaying the Hello world! message. You can refer to the picture below for reference.

installing Java

End Of Article

End Of Article